
These gluten-free Halloween cookies are soft, festive sheet-pan treats made with almond flour and decorated like a pumpkin patch!

Looking for a fun Halloween treat that's gluten-free and kid-approved? These chewy gluten free halloween cookies are made with almond flour for a chewy shortbread-like consistency and are shaped like tiny pumpkin patches. Whip them up in just 30 minutes -- they're the perfect combo of festive, healthy (ier), and delicious! Note, the cookie part isn't overly sweet, but each cookie is loaded with chocolate chips and topped with chocolate frosting, oreo crumbles, and little candy corn pumpkins to make them look like a festive pumpkin patch. Plus, the convenient sheetpan style of these cookies makes them easy to make, and you can cut them as big or as small as you want!
As a Dietitian, I love baking with almond flour and have been doing so for over a decade. Almond flour is a nutrient-dense flour that is lower in carbohydrates and naturally gluten-free. So, even though there is still plenty of sugar in this recipe, it also contains some healthy fats and protein for the win! Plus, they are ready in about 30 minutes and super fun to decorate. My kids loved making them and eating them!
Cooking Tips For Perfect Gluten-Free Halloween Cookies
Start with room temperature eggs, if you can. Otherwise, the cold eggs will cause the coconut oil to become solid and clumpy. This isn't a deal-breaker, I've done it and it's okay, but it isn't ideal, so if you can take your eggs out about 30 - 60 minutes before starting your cookies, that is ideal.
Choose chocolate chips based on desired sweetness level. If you want a sweeter cookie, use milk chocolate. I used semi-sweet, but for a healthier option, try dark chocolate!
Use an 11x17 sheet pan, lined with parchment paper. After you fold in your chocolate chips, you are going to start the process of spreading out the cookie dough on an 11 x 17 baking sheet. It will seem like the cookie dough isn't going to fit across the pan, but it will! I suggest putting another piece of parchment paper over the top and using a spatula or rolling pin to help spread out the dough.
Pull them from the oven at the right time. You'll bake the cookies for 20-25 minutes, or until edges are slightly brown and an inserted toothpick comes out clean. Remember, underbaked cookies are always better than overbaked; however, in this case, if you pull them too early, they won't stick together. See the photo below that shows the frosting going on, you'll see the golden brown edges in it that indicate doneness.

Allow them to cool COMPLETELY. You'll then need to allow the cookies to COMPLETELY cool before you start adding any fun toppings. I typically use Simple Mills or Miss Jones frostings, which are dairy-free and delicious. However, they do melt quickly because they are coconut oil-based, so it's essential for your cookies to be completely cooled.
Perfect "Oreo" crumb topping. While the cookies are cooling, you could make your Oreo cookie crumbs. Gluten-free Oreos work great! You can actually grind them in a food processor with or without the frosting in the middle. With the frosting, the crumb will be slightly wetter, and without it, the crumb will be drier. For this post, I did without, but in my recent video, I did with. Works both ways!

Pick what size cookies you want. To cut them, I used a ruler to measure out the length and width of each cookie. I used toothpicks to mark my place, which worked well. Each cookie was about 3 x 2.5 inches for this post, about 15 cookies. But again, for my recent video, you'll notice I cut it way smaller, about 24 cookies, which worked well. So you can have a ton of smaller cookies, or fewer bigger cookies!

Choose your decorations. To decorate the cookies, I used Halloween cupcake toppers. I had to cut off about ¼ an inch from the stick to make them the right height for decorations, but otherwise, they worked great. For my recent video, though, I didn't have the cupcake toppers, so I used green cookie icing and made vines all over it, which was also super cute! To make the vines, I did curly cues connecting each pumpkin to the others. Everyone I gave these cookies to LOVED them! As always, let me know if you try them!


Pumpkin Patch Gluten Free Halloween Cookies
Ingredients
- 1 tsp vanilla extract
- ⅔ cup melted coconut oil
- ⅔ cup maple syrup
- 4 room temperature eggs
- 6 cups almond flour
- ½ teaspoon sea salt
- 1 tsp baking powder
- 1 cup chocolate chips
- 11 ounces chocolate frosting
- 1 cup oreo crumbles
- 1 bag candy corn pumpkins
Instructions
- Take eggs out of the fridge and allow them to heat up a bit. You don't absolutely have to do this, but if you skip this step, the coconut oil will clump when you mix it together. Preheat oven to 350, add a piece of parchment paper to a 17 x 11 sheet pan. Preheat oven to 350F. Add a piece of parchment paper to a 17 x 11 sheet pan.
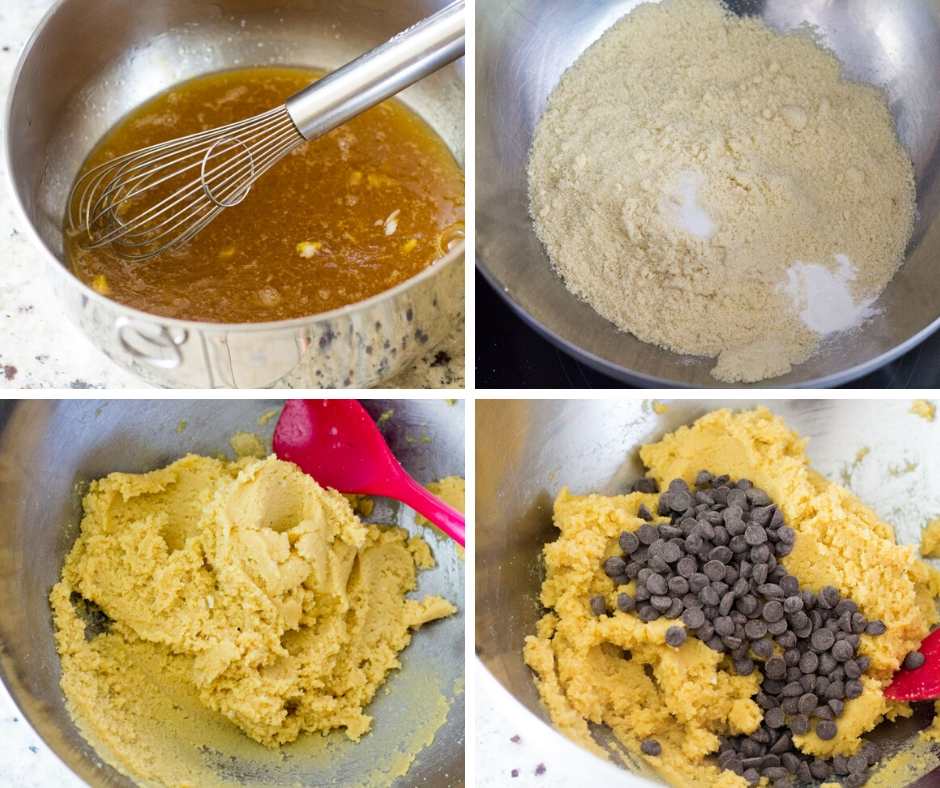
- Mix together vanilla extract, melted coconut oil, maple syrup, and eggs in a large bowl.
- Mix almond flour, sea salt, and baking powder in a large bowl. Add wet ingredients to dry and mix until dough forms. Mix almond flour, sea salt, and baking powder in a large bowl. Add wet ingredients to dry and mix until dough forms. Fold in chocolate chips.
- Spread dough across the sheet pan. To help roll it out, place another piece of parchment paper on top of the dough and use a rolling pin or wine bottle to help you roll it out evenly to the edges.
- Bake for 20 minutes until the edges are light and slightly golden brown. While cookies are baking, grind Oreos (middle of oreo removed) in a food processor to create 1 cup oreo crumbs.
- Let cool completely before adding frosting! Once cool, add frosting and sprinkle Oreo crumbs on top. Cut into 24 cookies (or more) and decorate with pumpkins and cupcake decorations, or make green vines with cookie frosting.
Notes
Nutrition
Ingredient Swaps & Substitutions
- Coconut oil: You could swap palm oil or butter if needed, but it will change the flavor of the cookie. I wouldn't recommend using a standard cooking oil like olive or avocado, because it doesn't have the same solidifying properties. Since there is no gluten in this recipe, we use things like coconut oil and eggs to solidify the recipe.
- Maple syrup: You can substitute any liquid sweetener, such as agave syrup, honey, etc, but it will change the flavor. Remember that liquid-to-dry ratios are important in baked goods, so subbing something like brown sugar won't work. Equally, I haven't tried using non-nutritive sweeteners.
- Eggs: As discussed earlier, room temperature eggs work best. You could try a vegan egg substitute, such as flax eggs, and in theory, it should work, but again, I haven't tried it!
- Almond Flour: Do not substitute this flour. Almond flour can be tricky to bake with, and this recipe was made specifically to use almond flour. Substituting any other type of flour is definitely at your own risk.
- Toppings & Chocolate Chips: These can be swapped as desired! Use milk chocolate chips for a sweeter cookie, or dark chocolate for a healthier option. You can forgo the toppings altogether, but please note that the cookies are not overly sweet on their own.
Storage and Freezing Tips:
To store: Store these on the kitchen counter for up to a week in an airtight container, unless the frosting starts to melt, then you can refrigerate them. My hubby prefers them cold, but you can store them either way, and they will be safe. They can be stored in the refrigerator for longer, up to two weeks usually.
To freeze: You can freeze these cookies, no problem, then defrost them in the refrigerator. They may become slightly crumbly after freezing, but they will still taste great. I don't recommend freezing the candy corn pumpkins on top, though; they probably won't stick. But the baked cookies with the chocolate frosting and Oreo should be fine if you have too many leftovers. You can also make the dough ahead of time and freeze it, then bake it after defrosting in the refrigerator. Again, even just freezing dough can lead to more crumbly cookies, though, and I haven't tried it, so let us know if you do!


Leave a Reply